Latest News
Create a slick dropdown or flyout menu in minutes
3 Posted February 28, 2012 by Rockstar Frog Categories: Code SnippetsAs the amount of content in your site grows, at some stage you’ll want to implement a drop down or fly-out menu to better group the navigation on your site. Implementing a drop down or fly-out menu isn’t rocket science and we’re going to show you how to achieve a basic drop down menu in just a few steps.
Firstly, we’re going to want to enable WordPress’ wp_nav_menu() function in your functions.php file.
register_nav_menus(
array(
'topmenu' => 'Main Menu',
)
);
}
Now that WordPress is ready to handle menu’s, we can add this snippet of code to our theme wherever you want your menu to display.
Note that we’ve set the depth of our menu to 2 levels. You can of course set this to more, but in order to be a hierarchical menu, it must have at least 2 levels.
This default, un-styled menu should look something like this:

We’re going to change this into a drop down menu, so we’re going to add some CSS to get these items to display vertically inline and give it a bit of style at the same time
#nav li {list-style:none;display:block;float:left;position:relative;}
#nav li a {display:block;float:left;padding: 5px 10px;background:#ff7668;border-radius: 3px;-webkit-border-radius: 3px;-moz-border-radius: 3px;margin: 0 10px 0 0;color:#fff;}
#nav li a:hover, #nav li:hover>a {background:#e3695d;}
#nav ul {padding:0;display:none;} /* Hide the nested UL for now until we're ready to display & style it */
Now our menu will look like this:

Before we add the single line of jQuery that will show/hide the drop down menu, we’re going to style the drop down menu so it looks how we want it to look.
#nav ul li, #nav ul li a {float:none; border-radius: 0;-webkit-border-radius: 0;-moz-border-radius: 0;margin:0;}
#nav li {margin: 0 0 10px;}
#nav ul li a {width:120px;}
So basically we’ve removed the border-radius as well as the floats from the nested LI’s. That results in this:

A bit “meh”, but we’re going to add some flair now. Firstly, we’re going to add a custom class to the first and last LI items in each nested UL. The jQuery for this is:
$('ul', this).each(function() {
$('li:first', this).addClass('firstli');
$('li:last', this).addClass('lastli');
});
});
The reason for doing this is that we want to add a border-radius to the first and last LI’s to round off the dropdown menu’s. Also we want to add a little ‘span’ element before the first LI in each nested menu. We’re going to CSS this span to become a CSS triangle that’ll act as a small arrow above the drop down.
We add this span element with some jQuery:
With these classes applied, we can now spruce our drop down menu’s up even further:
#nav li.lastli a {border-radius: 0px 0px 3px 3px;-webkit-border-radius: 0px 0px 3px 3px;-moz-border-radius: 0px 0px 3px 3px;}
#nav .arrow {position:absolute;top:5px;left:20px;width: 0;height: 0;border-left: 5px solid transparent;border-right: 5px solid transparent;border-bottom: 5px solid #ff7668;}
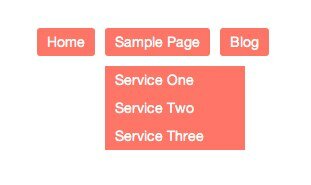
And now we have a smart looking sub menu:

Finally, we want to add the magic line of jQuery that’ll show and hide our sub menu on rollover. It’s just a single line of code:
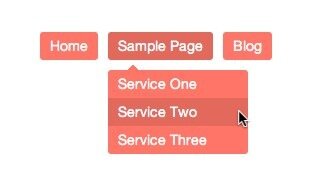
Now if you hover over any LI that has a nested UL, the nested menu will show and hide automagically. You can even jazz it up further by changing the above line of jQuery to animate the showing and hiding of the menu item. For example:
If you want a fly-out menu rather, then the only thing that changes is the CSS:
#nav li {list-style:none;display:block;position:relative;}
#nav li a {display:block;padding: 5px 10px;background:#ff7668;border-radius: 3px;-webkit-border-radius: 3px;-moz-border-radius: 3px;margin: 0 10px 0 0;color:#fff;}
#nav li a:hover, #nav li:hover>a {background:#e3695d;}
#nav ul {padding:0 0 0 10px;position:absolute;top:0;left:120px;display:none;}
#nav ul li, #nav ul li a {float:none; border-radius: 0;-webkit-border-radius: 0;-moz-border-radius: 0;margin:0;}
#nav li {margin: 0 0 10px;}
#nav ul li a {width:120px;}
#nav li.firstli a {border-radius: 3px 3px 0px 0px;-webkit-border-radius: 3px 3px 0px 0px;-moz-border-radius: 3px 3px 0px 0px;}
#nav li.lastli a {border-radius: 0px 0px 3px 3px;-webkit-border-radius: 0px 0px 3px 3px;-moz-border-radius: 0px 0px 3px 3px;}
#nav .arrow {position:absolute;top:10px;left:5px;width: 0;height: 0;border-top: 5px solid transparent;border-bottom: 5px solid transparent;border-right: 5px solid #ff7668;}
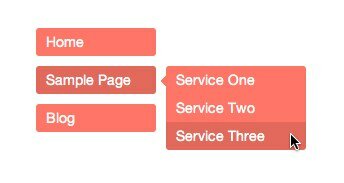
And that changes our menu into a flyout:

We’d love to know if you’ve used this code in your design. Share a link in the comments below!
Leave a Comment
popular news STORIES
TimThumb not displaying images? Let’s fix that!
If you've noticed that a number of images aren't displaying correctly ... Read more
Adding a Tweet Box to your site
Both Windows and Mac are integrating social media platforms more and m... Read more
Valentines Giveaway: Win a copy of our new gorgeous theme – Occasions
Love is in the air, and lucky for you frogs aren't immune to Cupid's m... Read more
Create a slick dropdown or flyout menu in minutes
As the amount of content in your site grows, at some stage you'll want... Read more
Hello, lovely tadpoles! Do you remember our post about adding Twit...
eFrog News Categories
- Code Snippets (8)
- Company News (8)
- Competitions (2)
- Frogology (7)
- Icon Sets (2)
- Plugins (3)
- PondTV (2)
- Security (1)
- SEO (7)
- Specials (3)
- Tips and Tricks (20)
- Uncategorized (1)
- WordPress Themes (23)


Comments
Nice post Rockstar! Quick question, which browsers are compatible with this code?
ReplyWhilst the CSS might need to be adjusted for layout purposes in some browsers, the jQuery is bulletproof and works perfectly in all tested browsers: IE7+, Chrome, Firefox, Safari
Cheers!
Reply